Cute huh! Until next time,.... stay Craftin' Scrappin' Happy!!!! ~Amanda M. Chaney
Sunday, August 26, 2012
More Burlap Footballs!
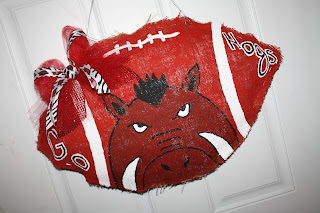
Okay so after posting the pics of the Burlap Footballs I made I began to get orders for some Razorback ones and another House Divided one (previous post,.... take a look at the others too!) and then I received one for a Dallas Cowboys Football! It turned out so cute but was specifically made as a gift for a man and did not want to "girly" it up with a bow so I just added some blue and silver wire twisted together to give it something more so than just a wire to hang from! Take a look,....
Burlap Football Door/Wall Hangers!
Alrighty,... so I have seen these on Pinterest and thought how cool it would be to make one in my own style being that I have a "house divided" situation and so I did! These turned out super cute. One of my friends came over to get Craftin' Scrapping Happy with me and wanted an all Arkansas Razorback one for herself and so we made her one too! I drew out all the artwork, made the bows and letters and she painted hers. I did everything on the other one being the Tiger/Hog one! I am so ready for Football Season this Friday it is not even funny!!! So with the Hog, I just think it turned out super cute! The one with the Tiger, we you know I had to make the Tiger a female to represent me and the Hog to be a male to represent my husband! Ha! Yes it is true,.... until further notice this marriage has been put on hold for football season! Bahahahahaha! Check them out below:
These were so cute and fun to make,... gonna make others and of course try some different shapes too! Hope you enjoyed and as for the other stuff I have completed before doing these footballs today I will get those posted as well! Well look for these on Pinterest as I am about to add my own! Until next time,... ;-)
These were so cute and fun to make,... gonna make others and of course try some different shapes too! Hope you enjoyed and as for the other stuff I have completed before doing these footballs today I will get those posted as well! Well look for these on Pinterest as I am about to add my own! Until next time,... ;-)
Saturday, August 25, 2012
Spirit Shoes!
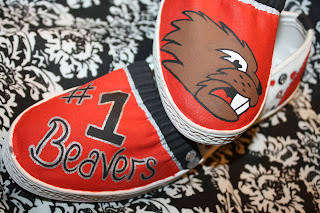
Okay so I have been quite the busy little bee here lately with the kiddo's, work, being the cheerleading coach and a lot more,... so I have also done some crafting but my most recent completed craft project were some "spirit shoes" for my daughter! They turned out so cute and after seeing all the "Toms" and "Bobs" being painted I found some all white shoes similar to them and decided to give it a try and how adorable they did turn out! My husband said they looked store bought which is a huge compliment that he would buy them decorated the way I did them! I have plans to make me some as I found some black shoes similar to the "Toms" and will be painting them this weekend or I hope so and will post pics of them?! HA! I have done other stuff since being on here last and have plans to update those pics too but for now,.... check out how cute the shoes turned out as I freehanded all of it on my own by looking at a t-shirt that had the "fighting beaver" head on it,....
Not bad huh?!,.....
I am thinking Kayleigh will have a lot of friends wanting some?! :-) Too cute but really more so cute and Adorable in person! Simply love how they turned out and was getting excited before I had ever finished them,.... I had to stop myself from TOTALLY blinging them out as I thought it would take away from the beaver head! Either way,... gonna be cute on her! More pics to come,....
Thanks for looking and reading and until next time,....
Monday, May 28, 2012
Memorial Day 2012 - Red, White and Blue Cake! YUM!
Wow,... it has been over a month,... yes I know,.... I am so trying to stay up on all of this but with having surgery and being out of commission for a while I am ready to get back at it! So today is Memorial Day and I have decided to try my hand with making a cake with Red, White and Blue cake layers! It was not the prettiest cake I have ever made but man it sure was delicious and so easy! (Using a box mix!) Ha! Yes I know I cheated! LOL Either way,... look,....
The outside of the cake is of course darker (green looking - blue & yellow for the white) than the inside but once cut it is the right colors and was awesome!,....
I put the frosting in the microwave just a few seconds in order to drizzle over the cake (because I hate to spread icing). Ha! I do this all the time with chocolate ones I do and so fast and easy!
I like how the layers are not perfectly straight across and a little off! Maybe with a square or rectangle pan it would be different! Have fun in making yours because you know you want to try it too! ;-P
'Til next time,.......
Wednesday, April 25, 2012
New Scrappin' area!
So I have been sick in which naturally I got it from my kiddo's so I have not been doing much but I have managed in the past 2 weekends to move my scrapbook craft area into our main room of our house from our bedroom with yes,... Lance's approval! (As if I asked before doing so! LOL) No he is really good with understanding my "addiction", "obsession" and "therapy" I NEED at times! ;-P This just allows me to be in the same room and area as my kid's and family are and still be able to scrap a little without feeling isolated from them! I really do like it and look forward to being able to do more since it is staring at me everyday calling my name to come over and get Scrappin' Happy! LOL ;-) Anyways,... check it out,...
THE SETUP!!
Hidden paper,...
Paper, paper, paper,... can't have too much! :-)
GOODIES!!!
One of my favorite antiques turned into my punch storage,... (It was too tall to put all of it up as it is 10' tall!)
Antique desk,....that I love for my cutting area,... pictured is my "older" expression as my wonderful hubby just bought me the new Expression 2 and I have not been able to play with it yet as tonight is only the 2nd night I have had it but will soon be on my cutting desk! Woo hoo! Thanks baby! :-)
Saturday, March 24, 2012
Homemade To Do List!
Okay so I had my Girl Scout troop do this as a project too so they can be more "responsible" around their homes to "help" out around the house! We did this at our last GS meeting! Of course I had to make one with the girls'! hehehe It turned out so cute. So basically start out with two pieces of coordinating 12x12 scrapbook paper or really any size you want to make. I used 12x12 paper. So get your supplies ready,..... cardboard (I used a display board so we could make more than one or you can use the rectangle cardboard in the cake decorating section as I have done before), exacto knife, glue, bamboo sticks, straws (colors to match your paper or clear), pens, and/or ribbon & flowers or any embellishments if you choose to decorate it with. You will need your glue gun also! :-)
Once your straws are on you are going to do the same thing to the other side but with the glue for now to make sure your sticks will line up with the other side,...

So cut a piece of cardboard for the 12x12 paper you will want your "to do items" on and then another piece a bit bigger for the piece of the board to show behind the sticks and straws. Glue the paper on the front of the pieces you have chosen. (Be sure to glue your paper correctly on the cardboard so you have the holes on the side of the cardboard). See below,...
Cut the 12x12 one off center such as at a 1/3 mark. The bigger side will be on the left for writing the tasks on and the smaller on the right side. Take your bamboo sticks and place in the side of your cardboard with the corragated view showing on the sides, not on the top and bottom, spaced out for as many "chores" you will have listed. I chose to do a "Every Day" and Every Weekend" chore list. You can do "Every Day" and "Every Week" if you would like and just add ever how many straws you will need on the "Every Week" section as to how many times a week that chore is to be done!
Once you have the straws where you want them and figured it out, use the glue gun to place a small amount on the end and push into the holes in order to keep them from moving around on you when inserting the others. This is very important or you will want to throw it all down by the end of it because they move and come out of the holes once in without the glue! :-) Check it out below.
Let's add the straws now! Cut small pieces of straw to slide back and forth on the sticks,...
Once your straws are on you are going to do the same thing to the other side but with the glue for now to make sure your sticks will line up with the other side,...

After you do that pull it out and then place a little glue on each end as you did before and insert them in the correct holes to hold the sticks still. Once you have done that you can glue ribbon on to the back to make it to hand or use velcro or how ever you want to hang it. I chose ribbon and to cover the back of it with white cardstock to cover the ends of the ribbon as below,....
Once you have done that write out your lists and get out your embellishments and such and decorate it as you would like!
I think they turn out so cute and Kayleigh is using hers this weekend for the first time since it was just completed this past week a little at a time as I would get off of work! So cute and practical for her! Unlimited possibilites on decorating these such as putting their names down the right side, buttons, etc.! Get the kids involved and HAVE a CRAFTIN' SCRAPPIN' HAPPY TIME!!!! 'Til next time,..... ~ Amanda M. Chaney
Subscribe to:
Comments (Atom)


